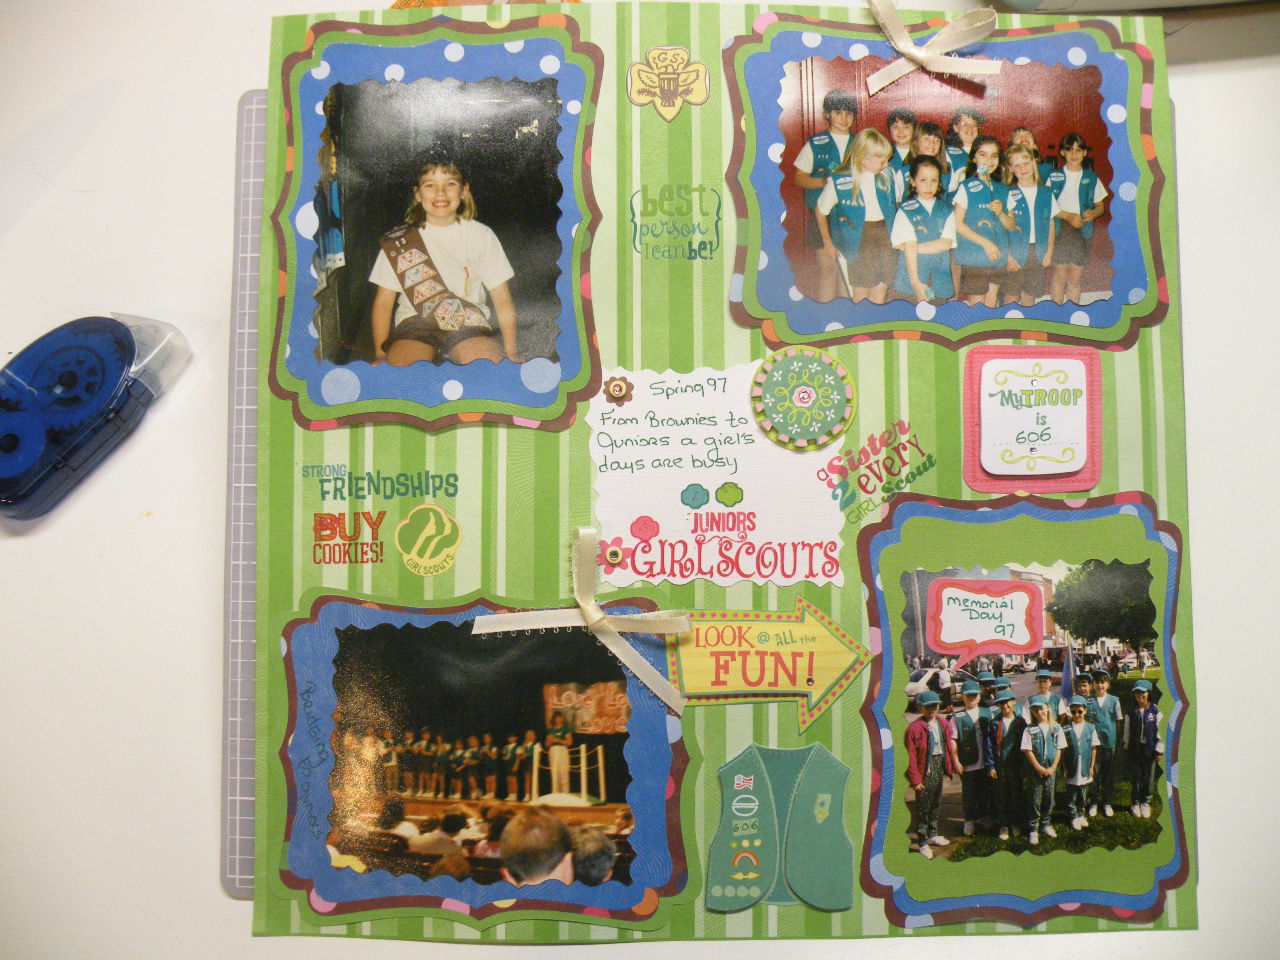
This scrapbook layout was created for the spring of 1997 when my daughter "bridged" from Brownie Girl Scouts to Junior Girl Scouts. I had alot of fun creating this page with the help of my Cricut Create Personal Cutter and some fun official Girl Scout embellishments I found at Jo-Ann's.
This particular scrapbook layout had very few steps once I was able to determine the size and shape that I wanted for each photo in the layout.
Scrapbooking and Card Making using a Cricut is also a fun experience, the scrapbooking supplies are easy to find at any specialty store or the craft department of a department store.

Specifics:
This is a correspondence themed cartridge, filled with cutouts such as inkpots, stamps, quills, and beautiful designs. You can create phrases, tags,envelopes,and so much more. Perfect for a beginner's collection of Cricut Cartridges.
- Pressure: High
- Speed: Medium
- Blade Depth: #2
Photo Layers
Using my Cricut, I was able to create three different layers for each photo in the scrapbook layout. This gave the entire scrapbook layout more of a 3D look. The size of your photo entirely determines the sizes of each of the three layers. I've created a simple table below to help you determine your sizes.Photo Size Chart
Photo | Cricut Dial Setting | Finished Size |
|---|---|---|
3 3/4" | 3 3/4 | 3 3/4 x 4 3/4 |
4" | 4 | 4 x 5 1/4 |
4 1/4 | 4 1/4 | 4 1/4 x 5 1/2 |
4 1/2 | 4 1/2 | 4 1/2 x 5 3/4 |
Step 1

Cut 3 of <Card1>, page 65 using just the keyboard key alone. Make each layer one increment of size, 1/4", bigger than the other.
Step 2

Adhere the smallest layer to the middle layer, then adhere both to the biggest layer. Adhere each photo to the top layer, spacing the photo in the middle.
Step 3

Using either scissors or your Cricut, I suggest <Postage>, page 53, Cut 1 3"x3" plain cardstock for your journaling area. I used my ProvoCraft Paper Shapers #34-0003, which had a similar pattern to the <Card1> layers.
Step 4

Adhere the journaling cardstock piece in the middle of the scrapbook layout as shown, arrange your complete photos/layers around the journaling piece.
Step 5
I chose to purchase some great embellishments with the official Girl Scout logo. Simply arrange and adhere your embellishments around the photos. Add a couple of small hand-tied bows
Handy to Have:
The Girl Scout embellishments came from K&Company. The packet contained a variety of coordinated items pertaining to Junior Girl Scouting, including 3D items like the vest and a page of rub-on transfers. It gave the page a nice finished touch. I did see that K&Company also has similar packets for both Daisy and Brownie Girl Scouts.
I found a wonderful item to use for adhering my photos and embellishments to the scrapbook layout page. It is the Elmer's CraftBond Permanent Dot Runner ; very inexpensive and works great. Safe for photos as it is acid-free. I also purchased the Elmer's CraftBond refills
 .
.
I sincerely appreciate your visit to my blog and I thank you; please click on the "become a follower" link to continue to follow in the future.
That is some fun matting! Great layout!
ReplyDeleteThanks, I had alot of fun creating it.
ReplyDelete