
For the frames around the pictures I used the Don Juan cartridge
Specifics
Pressure: Max
Speed: Medium
Blade Depth: 2
I used lighter weight cardstock for the top puzzle pieces as they were not too intricate, and I used a heavier weight cardstock for the smaller pieces. I find that a heavier weight cuts better, especially on smaller cutouts.
Sizing
Because the photos are all different size, I won't list mine; however, I created a guide for you to follow, I've listed the finished "windows" created from certain sized frames in the "puzzle" shapes. Use the Don Juan cartridge, cut two of each-one patterned and one solid colored cardstock. When you adhere them to your layout, offset the patterned one just a bit to add an interesting touch.
<Charm>, page 70, Puzzle Key, No Other Keys
- Frame 3 1/2" = Approx 2" Photo Window
- Frame 4" = 2 1/4" Photo Window
- Frame 4 1/2" = 2 1/2" Photo Window
- Frame 5" = 2 3/4" Photo Window
- Frame 5 1/2" = 3" Photo Window

I used a bright sunny yellow printed cardstock for the background and adhered it to the base cardstock material.

I cut out one solid color and one patterned color piece for each photo. A guide to frame window size is located above.
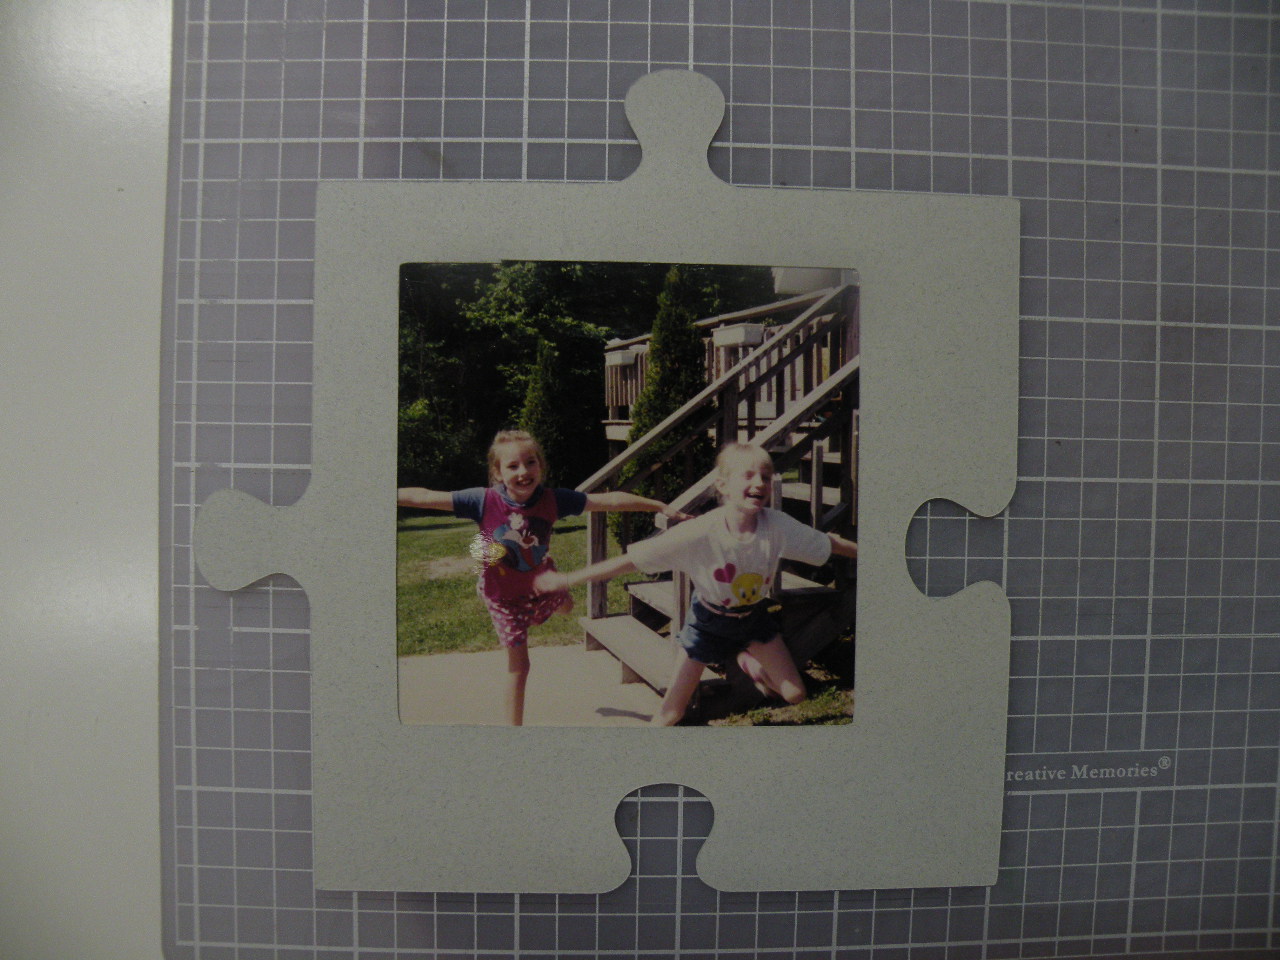
Adhere the photo to the back of the solid cutout using a thin bead of glue around the front of the photo

Adhere the solid piece/photo to the yellow cardstock. Then adhere the patterned cutout on top.

PAPER: Use the Simply Charmed Cartridge, Cut two <Paper>, pg 53, Size 2 1/4", No other keys needed.
NOTES: Simply Charmed Cartridge, Cut two <Paper>, pg 53, Size 2 1/4", Word Key, then two <Paper>, pg 53, Size 2 1/4", Word Key and Shift Key. Adhere finished cutout to scrapbook page.

I LOVE SUMMER: Simply Charmed Cartridge, Cut one <Wtrmln>, pg 46, Real Dial, Size 1/2" (fit best on my layout), Word Key, No Shift. Cut one <Wtrmln>, pg 46, Real Dial, Size 1/2", Word Key, Shift Key. Adhere the finished cutout to scrapbook page.

WATERMELON: Simply Charmed Cartridge, pg 46, Size 1". Cut two of each piece, No additional Keys. <Wtrmln1> Layer 1 (Rind), Green cardstock. Layer 2 (White Rind), White cardstock. Layer 3 (Red Watermelon), Red cardstock, Layer 4 (Cheeks & Shadowing), Pink cardstock, and Shadow (background) in a darker color. Adhere both watermelon cutouts to scrapbook page.

ICE CREAM CONE: Simply Charmed Cartridge, pg 44, Size 1". Cut two of each piece, No additional Keys, <IceCrm1> Layer 1 (Cone Top), Dark Pink Cardstock, Layer 2 (Icecream), Pink cardstock, Layer 3 (Shadowing), White cardstock, Layer 4 (Cheeks), Red cardstock, and Shadow (Cone bottom), Brown cardstock. Adhere each piece to the other starting with Shadow cutout and layer on top. Adhere to yellow cardstock.

SUN: Simply Charmed Cartridge, pg 50, Size 1". Cut two of each piece <Sun2>. Use Shift Key. When you cut 2 at the same time, be sure to use Shift Key right before the Sun key. For instance, Shift/Sun Key/Shift/ Sun Key. Layer 1 (Sun), Dk Blue cardstock, Layer 2 (Sun front), yellow cardstock. Layer 3&4 (Cheeks) too small to cutout, draw instead. Shadow (Sun background & rays) Dk Yellow / Orange cardstock.
- For the sun I wanted a darker background because my base paper was yellow, so I cut two additional Shadow cutouts using a 1 1/4" size.

- FINISHED PAGE: A nice sunny portrayal of a summer day
I sincerely appreciate your visit to my blog and I thank you; please click on the "become a follower" link to continue to follow in the future.
Great LO, we have featured your LO on Scrappin' Saturday over at Fantabulous Cricut!! I hope you can stop by to have a look!! http://fantabulouscricut.blogspot.com/2011/07/scrappin-saturday-ice-theme.html
ReplyDeleteThank you so much.
ReplyDelete