Summertime fun is always a great source of photos for a scrapbook layout and having a Cricut Die-Cutting machine and new rubber stamps makes the entire scrapbook layout fun, colorful, and easy to design and make.
The water and kids having a good time gave me the idea to use a "wavy" pattern for the layout, both on the background of the scrapbook layout and for frames for the photos.
My daughter spent alot of time in our backyard pool while she was growing up. Many times she was the only child and brought along her Barbie dolls for fun in the swimming pool. I got one great photo of her floating with the "ladies".
My Cricut die-cutting machine was put into use making frames for the photos I chose. I decided to use the Stamping cartridge because it has some nice frames to choose from, including a wavy patterned frame.

The water and kids having a good time gave me the idea to use a "wavy" pattern for the layout, both on the background of the scrapbook layout and for frames for the photos.
My daughter spent alot of time in our backyard pool while she was growing up. Many times she was the only child and brought along her Barbie dolls for fun in the swimming pool. I got one great photo of her floating with the "ladies".
The Layout
I used a watery colored scrapbook cardstock 12"x12" for the background of the layout. I also had a piece of 9"x12" Foamie style material with a 2mm thickness to add a 3D effect to the scrapbook layout. It gave me the feeling of water. I cut the Foamie carefully in half with an X-Acto knife making a wave pattern.My Cricut die-cutting

Specifics and a Hint:
When making a scrapbook layout with a Cricut machine and photos, cut the frame to size first, then cut and trim the photos. That way you will have the frames covering the photos perfectly.
Cricut Cartridge: Stamped
Speed: Medium
Blade Depth: #2
Pressure: Max
Cardstock: Use a heavy weight cardstock to cut out the frames and frame backgrounds
Speed: Medium
Blade Depth: #2
Pressure: Max
Cardstock: Use a heavy weight cardstock to cut out the frames and frame backgrounds
I chose a background scrapbook 12"x12" cardstock that had a "watery" feel to it. Then I adhered it to a plain piece of 12"x12" white scrapbook cardstock.
 From the piece of Foamie I cut in a wave pattern diagonally down the length of the 9"x12" piece. Then adhered it to the scrapbook base.
Testing, Testing
After a few test runs, I determined my photos needed to be 3 1/4" x 3 1/4" for a 3 3/4" frame cut with the Cricut machine. As you can see my photos need to be left a bit bigger, which is why I included the hint to cut frames first, photos second.
For each 3 1/4" x 3 1/4" photo:
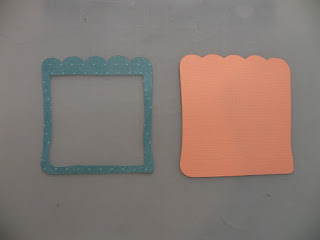 Cut one <SclpFrm1>, size 3 3/4" using the sclpfrm keyboard key. This cuts the intricate top layer of each frame.
Cut one <SclpFrm1>, size 3 3/4" using the Shadow and sclpfrm keyboard key. This cuts the larger bottom layer of each frame.
For the large 4 1/2" x 4" photo:
 Cut one <SclpFrm1>, size 4 3/4" using the sclpfrm keyboard key. This cuts the intricate top layer of the frame.
Cut one <SclpFrm1>, size 4 3/4" using the Shadow and sclpfrm keybaord key. This cuts the larger bottom layer of the frame.
 Adhere the bottom layers of each frame to the scrapbook base, positioning them in a pattern along the Foamie wave cut.
 Then position each photo in place.
 Adhere the top layers of each from on top of each photo.
 Using hindsight again, I think I should have place the photos so the blue frame were not next to each other, but another scrapbook page awaits to learn from.

 Cut one <GoodTime>, size 2 1/2" using the goodtime keyboard key. This cuts the top intricate layer of Good Times sentiment.
Cut one <GoodTime>, size 2 1/2" using the shadow and goodtime keyboard key. This cuts the larger bottom layer of Good Times sentiment.
Adhere to the top of the scrapbook layout.
 Add the journaling as always. I use a fun milky white pen for darker scrapbook cardstock.
Stamping: My newest passion! I use stamps from Stampin' Up. They are so incredibly accurate, with defined lines. The patterns are endless too. Slowly I will replace my less expensive (I'm being nice) stamps for the fantastic quality stamps from Lynn at Stampin' Up.

Testing, Testing
After a few test runs, I determined my photos needed to be 3 1/4" x 3 1/4" for a 3 3/4" frame cut with the Cricut machine. As you can see my photos need to be left a bit bigger, which is why I included the hint to cut frames first, photos second.
For each 3 1/4" x 3 1/4" photo:

Cut one <SclpFrm1>, size 3 3/4" using the Shadow and sclpfrm keyboard key. This cuts the larger bottom layer of each frame.
For the large 4 1/2" x 4" photo:

Cut one <SclpFrm1>, size 4 3/4" using the Shadow and sclpfrm keybaord key. This cuts the larger bottom layer of the frame.


Cut one <GoodTime>, size 2 1/2" using the shadow and goodtime keyboard key. This cuts the larger bottom layer of Good Times sentiment.
Adhere to the top of the scrapbook layout.

Stamping: My newest passion! I use stamps from Stampin' Up. They are so incredibly accurate, with defined lines. The patterns are endless too. Slowly I will replace my less expensive (I'm being nice) stamps for the fantastic quality stamps from Lynn at Stampin' Up.
I sincerely appreciate your visit to my blog and I thank you; please click on the "become a follower" link to continue to follow in the future.
No comments:
Post a Comment
I enjoy comments, they let me know how I'm doing.